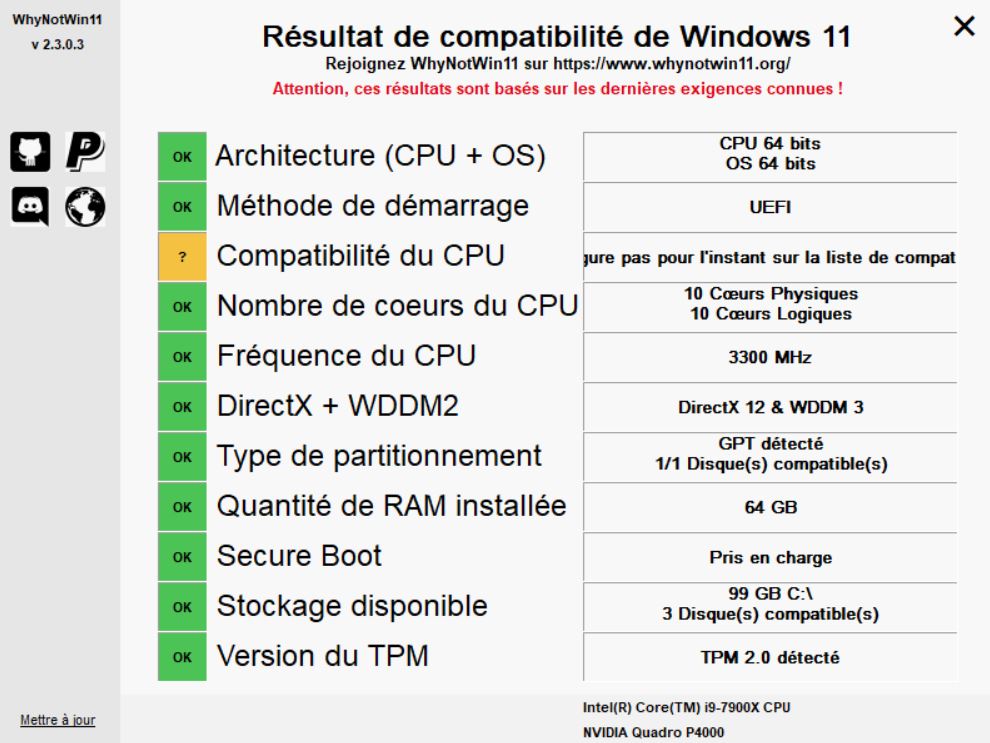
Here is how to interpret the WhyNotWin11 diagnostic results in detail:
Boot Method and Secure Boot
The computer first boots through either BIOS or UEFI (sometimes inaccurately referred to as « UEFI BIOS »). If you’re unfamiliar with this, [here’s a good article] explaining it. Very old PCs only have legacy BIOS, which is theoretically incompatible with Windows 11 — however, we’ll show you a specific workaround in the next steps. Since around 2006, some machines have supported UEFI. Typically, in your BIOS settings, you’ll be able to choose between « Legacy BIOS » mode (old generation), « UEFI-CSM » mode (newer generation with legacy compatibility), « UEFI » (pure UEFI). Select UEFI without CSM, or if UEFI and CSM are separate settings, enable UEFI and disable CSM.Partition Type
Your disk partitions are either GPT or MBR (older standard).- BIOS or UEFI/CSM boot is associated with MBR partitions
- Pure UEFI boot is associated with GPT partitions
- If you can’t enable pure UEFI, then stay with MBR.
- If you can switch to pure UEFI, you’ll also need to convert your partitions to GPT.
- ⚠️ Warning: Some methods to convert from MBR to GPT will erase all data. However, our guide explains how to switch from BIOS to UEFI and MBR to GPT without data loss.see here
- If you’re unsure, back up your data before starting — or contact us.
NOTE: After converting MBR > GPT, Windows will treat the drive as if it has changed, even though the drive letter remains the same.
You’ll need to reconfigure System Protection settings in Windows
(Right-click This PC > Properties > System Protection)
and reconfigure your backups.
CPU Compatibility
Core count and frequency : Officially, your CPU must be listed here. However, most 64-bit processors (see earlier), with a « no-execute bit » (already required for Windows 10), at least 2 cores, and a minimum 1 GHz frequency can likely run Windows 11.
For Windows 11 version 24H2 and later, your processor must support the POPCNT and SSE4.2 instruction sets.
This is mandatory.
If your CPU lacks these, you’ll only be able to install Windows 11 version 23H2, which reaches end-of-support around the same time as Windows 10 — so there’s no real benefit. If you’re unsure, use CPU-Z to check.
If your CPU supports POPCNT/SSE4.2, you’re good to go! !Direct X + WDDM
This concerns your graphics card.- If you’re using a laptop or all-in-one, and you see a red X here, it’s officially incompatible with Windows 11 and may cause poor performance.
- If you’re using a desktop PC or tower, it’s very likely you can upgrade your graphics card to a newer compatible model.
RAM Amount
You need at least 4GB of RAM.
If you have less than 4GB, most systems can be upgraded. We offer a free diagnosis to confirm this contact us. You can also visit Crucial’s website and use their system scanner to find out what RAM your system supports. If your PC can’t support at least 4GB, it is not compatible with Windows 11.Available Storage
This simply refers to having enough free disk space to install Windows 11.
If you’re low on space, in most cases it’s easy to free some up or upgrade your storage. We offer a free diagnosis to confirm this contact us. You can also visit Crucial’s website and use their system scanner to check what storage upgrades your system supports.TPM Version
The TPM (Trusted Platform Module) is a security hardware chip. See this article. This is one of the most common reasons for incompatibility. However, before concluding your PC lacks TPM, do the following:- Search Google using your PC model and « TPM » to see if a TPM chip exists or can be added.
Some motherboards have a header for installing an optional TPM chip.
If there’s no TPM and no way to add one, your PC is not compatible with Windows 11.
(Here’s an example of an optional TPM chip for a motherboard.)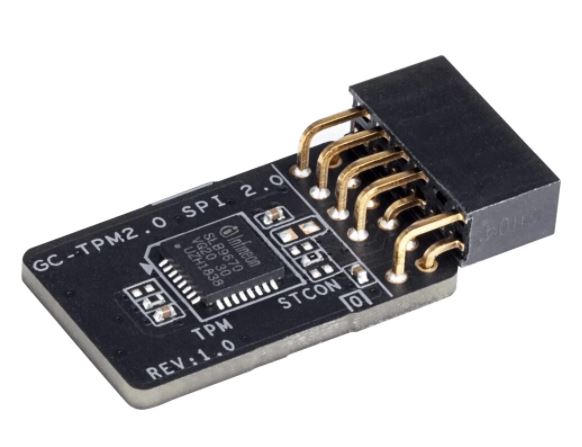
- If TPM is present or has been added, but remains inactive, update your BIOS to the latest version.
Then, look in the BIOS settings for the TPM option.
(Note: the name may vary — it could be listed as Security Chip, Intel Security Device, PTT, etc. The section may be under SECURITY, ADVANCED, or elsewhere.)
Enable TPM from there.
- Search Google using your PC model and « TPM » to see if a TPM chip exists or can be added.